
Introduction:
Release Management is a DevOps solution for Visual Studio Team Services and Team Foundation Server. It can help you automate software deployment and testing in many different environments. With Release Management, you can either have full automation of software or partial automated processes, with approvals and on on-demand deployments. This is really important element of DevOps which helps teams to continuously deliver software faster and with lower risk.
It can use manual or automated steps for approval of workflows and have great impact on collaboration and transparency between teams. You can also have full trails history as it tracks the status of recent deployments in each of the environments. You can custom PowerShell scripts for deployment and for the deployment of Artifacts from TFS and VSTS build.
Azure DevOps:
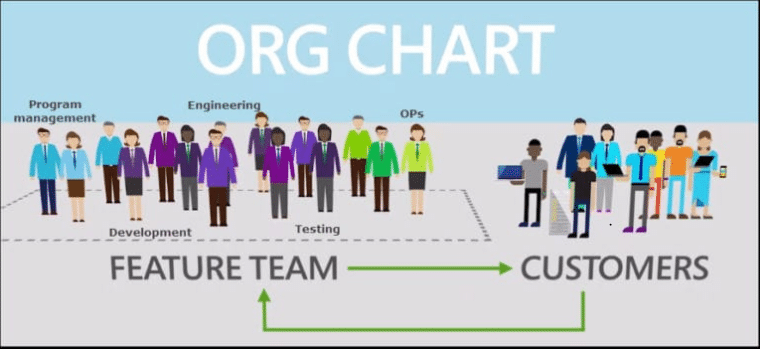
DevOps is a methodology interacting between Development and Operations. The DevOps methodology in a software world is often also referred as a methodology that overcomes the gap between Agile software development and operations. Our process in Intelisense is to utilize Devops methodology which enables a fluent process for Continuous Development and Continuous Integration.
The below diagram shows the collaboration between all participants and integration between developers and operations teams.
Visual Studio Team Services (VSTS) vs. Team Foundation Server (TFS):
Team Foundation Server is available in two different forms: on-premises and online. The latter version is known now as Visual Studio Team Services or Azure Devops. The cloud service is supported with Microsoft’s cloud platform, Microsoft Azure. For Visual Studio Team Services. You just need to sync in with Microsoft account to set up an environment and then you can start with creating projects and adding team members. It is highly recommendable to consider moving into VSTS online. The most common reasons other organisations give for making this move are:
- Simplified server management.
- Immediate access to the latest and greatest features.
- Improved connectivity with remote sites.
Automating deployment process using Build and Release pipeline in Azure DevOps:
In this post I want to give some additional guidelines on how to setup the hosted build automation and release of deployment packages using pipelines. This automates the process of building X++ code and creating deployable packages on any build agent (Microsoft-hosted agents) that run on Microsoft Windows.
Advantages:
- Avoid the setup, maintenance, and cost of deploying build virtual machines (VMs).
- Let’s you reuse the existing setup of build agents to run other .NET build automation.
- Huge cost savings spent on infrastructure and maintenance of an extra machine.
The following steps can be followed to create a successful build pipeline:
1. Publish Nuget package to artifacts:
Each time when the build pipeline is run, we will need to make sure the right version of the F&O dependency such as the compiler tools, application references are installed in the Microsoft hosted agent. You can manually download the NuGet packages from Lifecycle Services (LCS) and publish them to the DevOps Artifacts feed through CLI or PowerShell.
- Download the four NuGet packages from the LCS project to your laptop or development VM.
- Navigate to Artifacts and create a new feed on the project in Azure devops.
- To push the previously downloaded packages to the new feed you have to click on “Connect to feed”, select nuget.exe, and copy the settings for your NuGet.config in the dev environment.
- Download the latest version of the Nuget command line tool and put it into the folder C:\Temp\Nuget in the dev environment. Use the command “nuget.exe sources Add -Name “<NameOfYourFeed>” -Source “<SourceStringFromNugetConfig>” to publish the downloaded packages to the created feed.
2. Create Visual Studio Solutions and Projects to build
- Create a new Dynamics 365 Project in Visual Studio for your Model and add it to t Main->Metadata folder in the Devops branch for your project. The solution should contain the project, representing a model in a package that is to be built during the build pipeline
- Add nuget.config and packages.config in Source Control Explorer to the Main Metadata folder

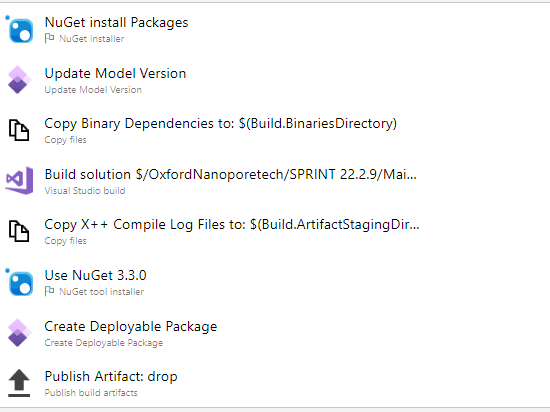
3. Build automation by creating Build Pipeline:
You can create a build pipeline using the custom legacy method or by importing YAML. Navigate to DevOps project > Pipelines. Click on the ‘Three Dots’ button next to ‘New pipeline’. The build pipeline has various steps which would perform a full build on your model, publish the artifact and update packages.config to create a deployable package
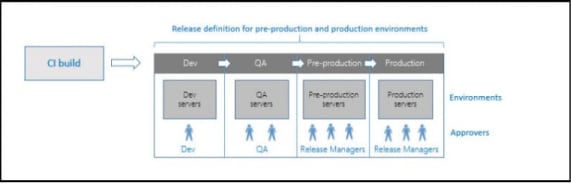
4. Release Pipeline:
- To configure the release pipeline, we need:
- AAD app registration
- LCS project
- An Azure DevOps project linked to the LCS project above
- A service account.
- We need to make sure the project we’re going to use is linked to LCS. This can be done in the “Visual Studio Team Services” tab in LCS’ project settings. After setting it up, we go to Pipelines -> Releases to create the new release in devops project. Select “New release pipeline” and choose “Empty job” from the list.
- Select the build that we will link to this release definition.
- Add a task with the release pipeline for Dynamics- Dynamics Lifecycle Services LCS Upload. This will upload the deployable package to LCS asset library
- In order to add it, the user used to create the release must have admin rights on the Azure DevOps account, not only in the project in which we’re creating the pipeline
- Create an LCS Connection: The task is setting up the link to LCS using the AAD app we created before.
- Add another task as a PowerShell script to store the LCS package as a variable asset ‘LCSAssetID’. This will help us utilize the package for multiple steps of deployment.
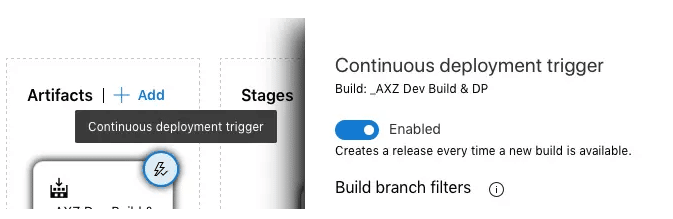
- Finally, you can add another task – Dynamics Lifecycle Asset Deployment. This will utilize the LCS File asset ID variable and trigger the deployment to respective environment. The release part can be automated, just press the lightning button on the artifact and enable the trigger: